SharePoint Hosted App series:
- Part 1: Configure Apps for SharePoint 2013
- Part 2: Create simple SharePoint Hosted App
- Part 3: Access list from SharePoint Hosted App
- Part 4: Create App Part
- Part 5: Create Chrome Control
Following from my SharePoint Hosted App series, In this post I would like to show you how you could create chrome control to blend your app with the host site.
Without further ado, please find below the list of steps to create simple chrome control:
1. Create new Project using App for SharePoint template in Microsoft Visual Studio 2013, enter the Name and Location, then click Ok

2. In Specifying the app for SharePoint settings window, enter the Site Collection URL and select SharePoint-hosted, then click Finish

3. Right click Scripts module > Add > Existing Item to add sp.ui.controls.js (this is OOB javascript file located in C:\Program Files\Common Files\microsoft shared\Web Server Extensions\15\TEMPLATE\LAYOUTS)

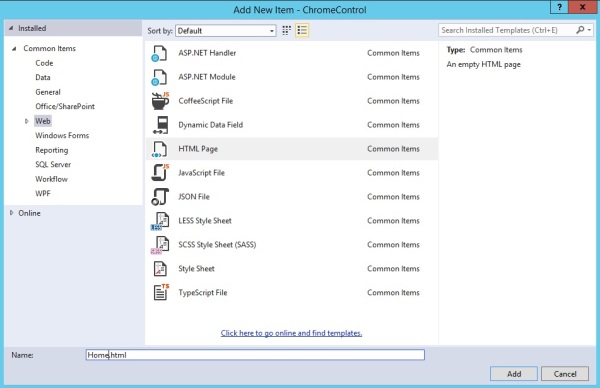
4. Right click Pages module > Add > New Item to add html page

5. On New Item window, select Html Page and provide the name Home.html
6. Populate Home.html to look like below
<!DOCTYPE html>
<html lang="en" xmlns="http://www.w3.org/1999/xhtml">
<head>
    <meta charset="utf-8" />
    <title>Chrome Control sample</title>
    <script type="text/javascript" src="../Scripts/sp.ui.controls.js"></script>
</head>
<body>
    <div id="chrome_ctrl_container" data-ms-control="SP.UI.Controls.Navigation"
         data-ms-options='{
            "appHelpPageUrl" : "../Pages/Help.html",
            "appIconUrl" : "../Images/AppIcon.png",
            "appTitle" : "Chrome Control sample",
            "settingsLinks" : [
                {
                    "linkUrl" : "../Pages/AboutUs.html",
                    "displayName" : "About Us"
                },
                {
                    "linkUrl" : "../Pages/Services.html",
                    "displayName" : "Services"
                }
            ]
         }'></div>
    <div style="margin: 50px;">
        <h2>Home</h2>
        <p>This is the home page</p>
    </div>
</body>
</html>
7. Right click Pages folder > Add > New Item to add html
8. On New Item window, select Html Page and provide the name AboutUs.html
9. Populate AboutUs.html to look like below
<!DOCTYPE html>
<html lang="en" xmlns="http://www.w3.org/1999/xhtml">
<head>
    <meta charset="utf-8" />
    <title>About Us</title>
    <script type="text/javascript" src="../Scripts/sp.ui.controls.js"></script>
</head>
<body>
    <div id="chrome_ctrl_container" data-ms-control="SP.UI.Controls.Navigation"
         data-ms-options='{
            "siteUrl" : "http://sp2013vm/",
            "appHelpPageUrl" : "../Pages/Help.html",
            "appIconUrl" : "../Images/AppIcon.png",
            "appTitle" : "Chrome Control sample",
            "settingsLinks" : [
                {
                    "linkUrl" : "../Pages/AboutUs.html",
                    "displayName" : "About Us"
                },
                {
                    "linkUrl" : "../Pages/Services.html",
                    "displayName" : "Services"
                }
            ]
         }'></div>
    <div style="margin: 50px;">
        <h2>About Us</h2>
        <p>About Us page</p>
    </div>
</body>
</html>
10. Repeat step 6 to 9 for adding Services.html and Help.html, don’t forget to modify the content of the page
11. Click AppManifest.xml and Set the Start page to ChromeControl\Pages\Home.aspx

12. Build the solution and Package the app
13. Browse to your App Catalog Site. Click new app to add new custom app, then enter the Name, Short Description, Long Description, checked Enabled and click Save
14. Browse to your Site Collection > Site Actions > Site Contents > Add an App > From your Organization > click Chrome Control > Add it to add the custom app to your SharePoint site
15. Click on Chrome Control App


I changed the look of the host site to Blossom, it will also change the looks of chrome control.


References

You must be logged in to post a comment.